Tips and Techniques...
 |
Image Transfer Techniques Many image transfer techniques. Including instructions on incorporating additional mixed media techniques to the Image Transfer technique - candle wax distressing, relief stenciling, stamping, stencil, color rouging. Epacket available with step-by-step instructions and photos. |
 |
Mixed Media Techniques 12 different techniques. Epacket available with step-by-step instructions and photos. |
Spring Tulips Step-by-Step
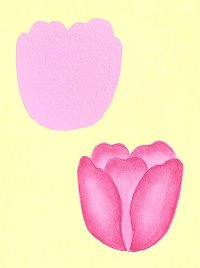

- Basecoat petals with Lilac, Melon and Poodleskirt.
- Corner load angle float shading along tulip petal edges – Lilac – Wild Orchard Melon – Cadmium Red Poddleskirt – Peony Pink
- Pull the veins in the petals with the same shade colors; by using the angle up on the chisel edge. Pull on a slight curve following the curve of that petal; giving the petal life.
- Basecoat the leaves with Arbor Green. With 0 liner and Hauser Dark Green, pull the veins in the leaves. Pull on a slight curve, following the curve of the leaves outside edges; giving the leaf life. Corner load the angle with Hauser Dark Green, float shading down the appropriate side of each leaf.
- Basecoat the stems with Arbor Green. Corner load the angle with Hauser Dark Green, float shading across the top of the stems, under the tulips.
Pussy Willow Step-by-Step
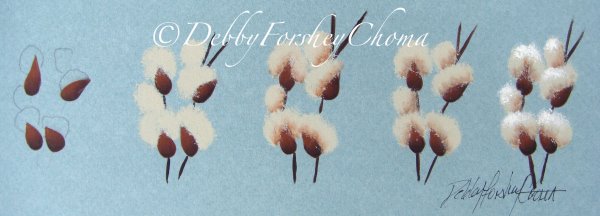
- Basecoat the pods with Light Cinnamon, using the 2 filbert. Corner load the angle with Soft Black, float a shade across the bottom of each pod.
- Double load the 0 liner with Light Cinnamon + Soft Black, pull the stems.
- With the small Texture brush and Bleached Sand, dance one coat on each catkin (fluffy part). Lightly dance to create irregular outside edges and a texture effect. Repeat step if necessary, to achieve a proper coverage over the background color, but still maintain a fluffy look.
- See proper use of my Texture Brushes below...
- Corner load the angle with Light Cinnamon, float in a choppy, hit and miss shade at the base of each catkin.
- Repeat the same steps with Neutral Grey.
- With the sm Texture brush, dance a highlight of Light Buttermilk at the top third of each catkin; refer to photo for placement.
Debby’s Touch Pines
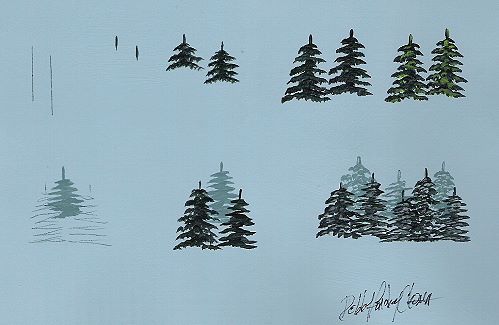
Everyday pines (top row)
- With a pencil and graph ruler, pull the center line for each pine. Slightly pre-dampen the surface area with clean water. This will help the paint bleed; giving the boughs a softer effect.
- Load the brush across the chisel edge with Black Green. Up on the chisel edge, vertically pull the top of the pine.
- Up on the chisel edge, horizontally continue to tap in the boughs. Tapping from left to right, slowly and slightly widening as you work towards the base.
- Slightly allow some of the background to show through, so the pine doesn't begin to look like a triangle. Randomly re-tap Black Green to deepen some boughs.
- Randomly Hauser Light Green on the boughs; for highlight.
Winter Pines (bottom row)
- Apply following previous steps - skipping step 5.
- Use Blue Mist for the lighter background pines.
- Use Black Green for front pines.
- For snow, slightly pre-dampen pines with clean water. Randomly tap Snow White on boughs.
For the proper use of my Texture Brush, use the following method:

Dampen the bristles with water to start the separation of bristles. Tap bristles into the paint on your palette, hold it perpendicular to your palette, pounce it up and down to get some of the paint off – keeping the paint sparse on the brush.
Note – this brush can be used on the whole foot or just the toe. Tap lightly on the surface, dance with the brush up and down, rolling the brush in different directions in between your fingers when it is up in the air (like dancing the twist, light on your feet).
Allow some drying time in between dances so the paint sets up and you don’t end up with a globby or muddy look.
Brushes are available in three sizes. Purchase here